
Thanks to Kevin Mitchell for providing hints and the source code link; both of these greatly aided in providing a complete answer.
man pages in Preview.appEnter
man -t <topic> | open -f -a Preview.app
To make a command-line alias to hide all these details, add two lines to your .bash_profile.
function preview_man () { man -t $@ | open -f -a Preview.app; } alias pm = preview_manpm 9 intro instead of man 9 intro in a terminal window,
the "intro" man page will open in Preview, as will all other topics you enter with pm.
man pages in Preview.app
For the journey from simple man to something much more Mac-like, see
ManPagesInPreview.html.
If you go there, I highly recommend opening your own Unix window in Terminal.app and follow
along by entering those commands in your own Unix window.
Enjoy!
In macOS 10.11, Apple deprecated
-(CIImage*)initWithCGLayer:
and
-(CIImage*)initWithCGLayer:options:
Well, I was using one of these APIs in my project in several places. Since I've upgraded to macOS 10.12, I needed a replacement. I have to have a way to create a CGImage from the contents of my CGLayer—or some other mutable drawing context‐so that I can apply whazzy Core Image Filters to it (here, whazzy equals astoundingly breathtaking special effects; Apple engineers seem to provide that often).
You can see some of the effects I'm after at LucidTime 1.0 clocks. Those shown there were made with the deprecated API, so a replacement for me is critical.
I say "a" workaround because there are many on the internet, mostly via StackOverflow. Unfortunately, nearly all of them are for iOS and Swift (not my thing right now). Nearly none of them explore the different color-depths; none use Apple's wide 128-bit floating point color. I needed something that was in Objective-C and used the macOS frameworks.
The starting point for my "journey to joy" began with the now ancient, yet indispensable resource for Quartz 2D developers:
Programming With Quartz 2D and PDF Graphics in Mac OS X,It remains an extremely valuable resource and viable reference work for Objective-C programmers. Even though it is is woefully in need of an update to remove deprecated APIs and use current APIs, the core of it is still valid and provides many useful working code examples. I have found working around the deprecated APIs to be trivial (well, except for topic of this Goodie).
by D. Gelphman and B. Laden; Apple Computer: 2006.
Here is the general "simple" solution.
-(CIImage*)initWithCGLayer: did all 4 steps in one step.
Remember, CGLayers and CGBitmaps are mutable; CGImages are not. And just to complete the picture, CIImages are transient between endpoints (source and destination).
Once you have the CGImage, you can then perform the Core Image effects on it as you desire—you can have your way with it, as it were—using CIImage image filters, CIFilters. You can then draw (pour) it back into another static CGImage and then, optionally, into a mutable CGLayer and go happily about your way. If, after you apply the CIImage effects to an output CGImage and no longer need the mutability that a CGLayer provides, you can just stop there and forego the subsequent drawing into a CGLayer (thus, saying goodbye to CGLayers). Your choice. Apple, unfortunately, does not make this choice obvious in its documentation.
Someone once asked Apple engineers, "When to use CGLayers?" Their response was, "Never." From the above paragraph, now you can see why. If you need an image to be repeatedly drawn, you can create it with a CGBitmap, draw into that, then draw that into an immutable CGImage. No CGLayers needed. But then, the question becomes, "Is it optimal? Does it happen on the GPU or main memory?" I don't know that answer; please tell me if you do.
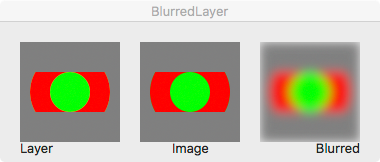
In my really simple example, I draw into a CGLayer (left image), then I use a CGBitmapContext to copy its context and create a CGImage for presentation (middle image). Pouring a (mutable) CGBitmapContext into a (static, immutable) CGImage is the only way to get it to the screen. Finally, I use that CGImage as input to a CIImage with a CIFilter—a Gaussian blur filter—to create the desired effect (right image). The CIImage is transient; the results of the transformation from the filter is poured into another immutable CGImage which is then drawn to the window's context.
While the simple solution above is probably perfect for 90% of developers, or maybe even 98% of them, in my case it does not suffice at all. I was using multiple CGLayers as "sub-layers" to compose them into a single resultant CGLayer and then draw it to the screen. This works great until you want to use some of the Core Image whazziness; then it doesn't.
I tried to compose my 4 CGLayers into one CGLayer and then into a CGBitmapContext to subsequently use the whazziness, and got... nothing. Believe me, I tried everything. It just didn't work; blank or incomplete result every time. I don't know exactly why. I suspect there is some behind-the-scenes optimization with the GPU memory versus main memory that interferes with the "bit-pouring pipeline" and subsequently spills the bits onto the floor, or rather, the computer's bottomless irretrievable bitbucket.
If you find you are doing something like this, one solution is to not draw into multiple sub-layers, but instead to draw directly into the CGBitmapContext (eliminate the initial sub-layers altogether). Then go from there. Basically just eliminate the CGLayers as a starting point but still end up with an immutable CGImage and optionally then into a mutable CGLayer, via its context.
In my case, I modified the drawLayer routine from drawing into the layers to instead draw directly into the bitmap context as needed. So I traded off blitting each layer into 1 context for drawing each layer's content into 1 context. The bitmap context was then used to create a CGImage. The CGImage was then manipulated with CIImage filters and the result was drawn into the final CGLayer, rendered to the screen.
Whew! But it works. Here's the sample project:
|
|
<— Click the image to save the .dmg to your downloads folder. |
The .dmg contains the following:
-(CIImage*)initWithCGLayer:Download it, build it with Xcode 8.2.1 on the latest macOS (10.12.3) and see what happens for you. You may have to modify the project's target setting codesigning. Otherwise, it should just work.
If you download, build, and run my attempted solution, I applaud your curiosity and desire to learn Objective-C. You are free to use it as you will, without restriction (free as in free). Use at your own risk. I make no guarantees nor provide any warranties.
I've put some useful and explanatory comments in the single code file, DrawingView.m,
as well as some experimentation hints.
I encourage you to "have your way with it"—modify, trim, tweak, twiddle and frobnicate it at your whimsy.
As you examine/tweak my sample code and attempt to work around the loss of what I consider an essential API,
I welcome your questions, your comments, and your corrections.
The current source file has the option of using pre-Tiger API calls; this adds about 50 lines of mostly unnecessary code to the project. I left them in for historical purposes. To simplify the code, you can safely delete all the code in the
#ifdef _BEFORE_TIGER_

  ...

  #endif
Thanks to Jeff Biggus (aka hyperJeff) for mentioning a way to dramatically speed up your Xcode builds. It even improves Xcode runtime functions like indexing, iOS simulations, and code completion/look up.
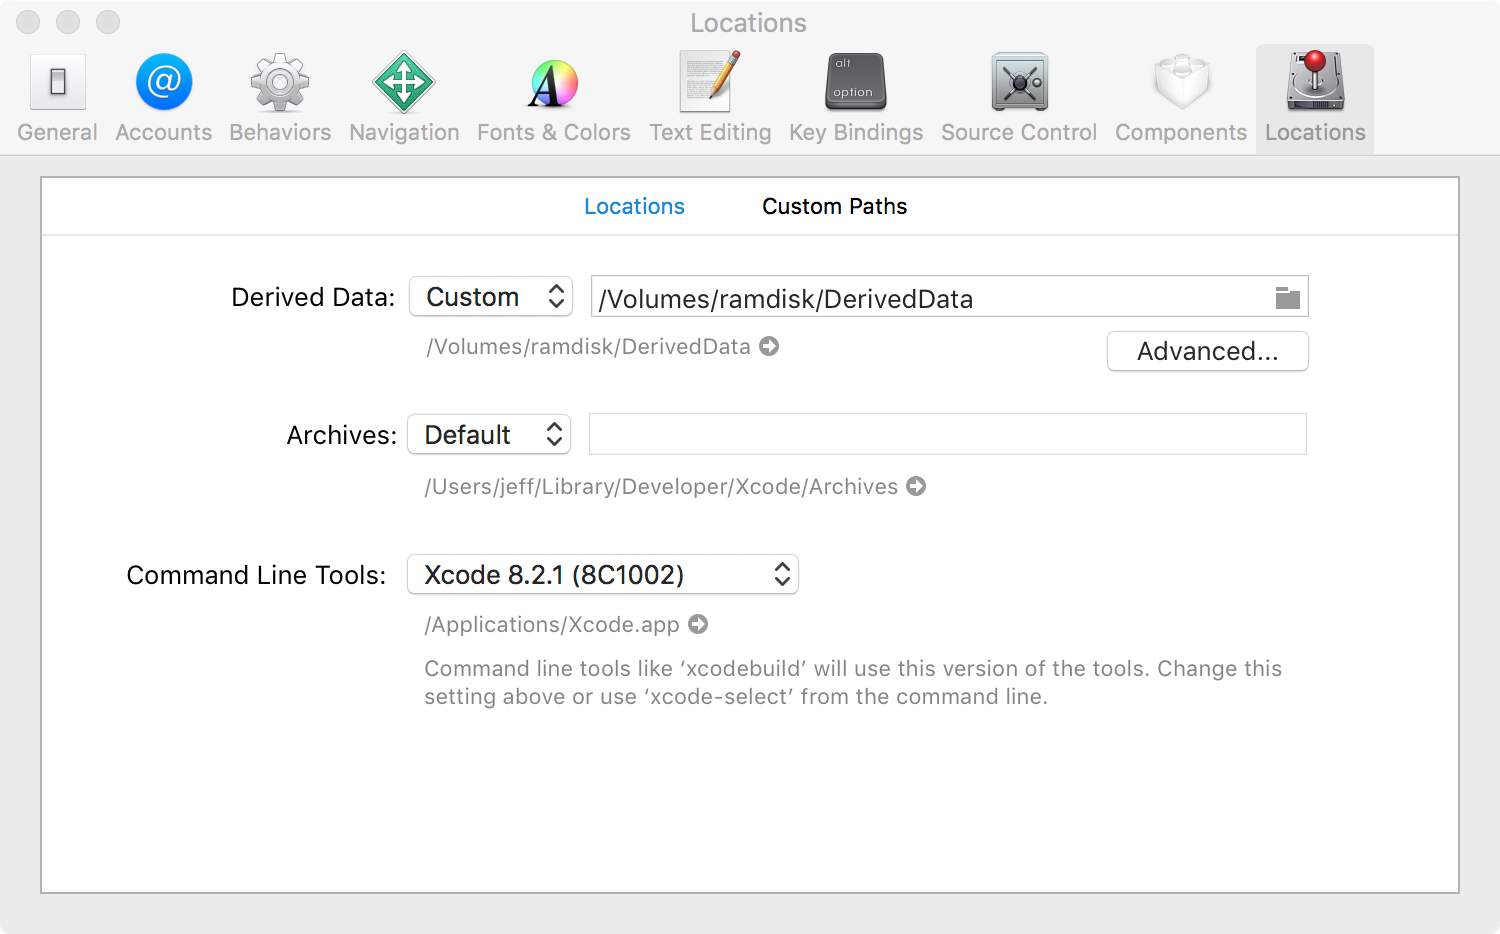
The way to do it is to create a RAM disk—a portion of your RAM that appears as disk volume on your system—and then direct Xcode to use that disk for its "DerivedData" folder. A RAM disk provides faster reads and much faster writes than even modern SSDs. By using RAM instead of your hard drive or SSD, you optimize the massive amount of reading/writing that occurs in the build process. While you can't eliminate reads from the SSD or disk, you can optimize writes (expensive) and subsequent re-reads. RAM is made for this kind of heavy writing/rewriting; your SSD and disk are not. So, this method prolongs the life of your hard drive and especially your SSD by avoiding the "beating" the compiler gives to your SSD or disk during compilation.
Xcode -> Preferences... -> Locations -> Locations Tab
and
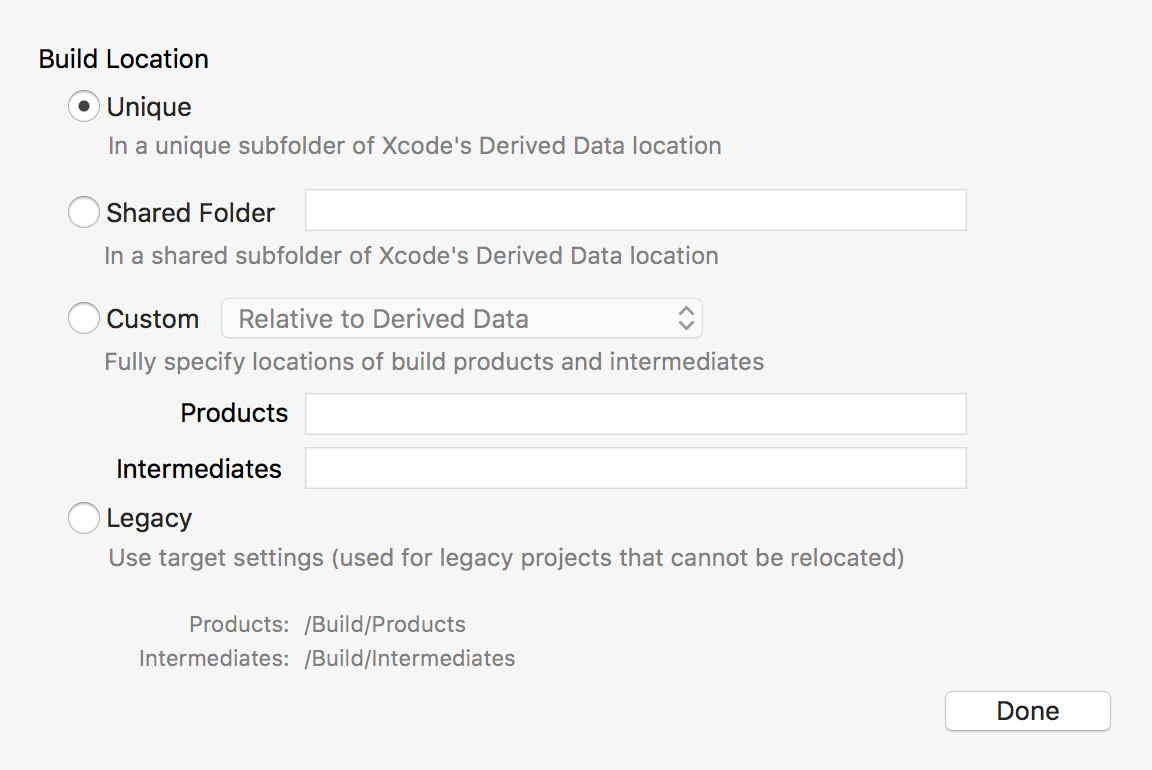
Xcode -> Preferences... -> Locations -> Locations Tab -> Advanced button
Here's the essential part of a Unix shell script you would use to set up your RAM disk:
  #!/bin/bash


  RAMDISK="ramdisk"

  SIZE=1024       #size in MB for ramdisk.

  diskutil erasevolume HFS+ $RAMDISK `hdiutil attach -nomount ram://$[SIZE*2048]`

  mdutil -i on /Volumes/$RAMDISK
UPDATE: 2017-05-08: added mdutil to turn on metadata indexing for the volume.
This is essential if you use Instruments and would like symbols to show up there;
Instruments uses metadata indexes to find the symbols.
h/t to Kevin Mitchell.
UPDATE: 2017-01-30: changed the #! line to get the correct bash executable and fixed the variable expansions.
You can then run this script manually, or at login, or using an Automator application. Remember to run it before running Xcode. If you change the name from "ramdisk" to something else you prefer, be sure to change it both in your script and in Xcode preferences so they match.
This method is perfect for Xcode DerivedData because everything stored there is temporary. The RAM disk is deleted on logout or reboot; so anything stored there is wiped out. The volume is unmounted; it is not persistent and your script must be rerun at next login to recreate an empty RAM disk.
Also, you must be careful to
You could—but I also haven't bothered—use a RAM disk for other application caches, like Safari or Chrome. There you certainly have to be more aware of your RAM disk size and usage. But for the single use of Xcode building, using a RAM disk is highly recommended.
This method is so effective, it sometimes makes we wonder why Apple doesn't build in 2 GB of dedicated cache RAM for more of macOS's caches. But then, I'm busy enough with my own problems...
This "Lightning Talk" was presented to Eastside Seattle Xcoders on 9/22/2016. Lightening talks are supposed to be 10 minutes or less. Apparently I am not capable of giving such a talk as I barely covered what I wanted in 22 minutes. So, it was more of a midwest summer thunderstorm rolling across the plain.
This presentation focuses on CGPaths using Objective-C Core Graphics APIs. It provides basic path concepts, emphasizing the difference between the single "built-in" and transient path of a CGContext versus persistent and re-usable CGPath objects.

|
<— Click the image to save the .dmg to your downloads folder. |
The .dmg contains the following:
There are enough comments in the code that it could stand on it's own as an introductory learning tool/sample code.
I highly recommend you play with the project, adding, removing, rearranging the various Core Graphics calls to see what happens. In particular, reorder the CGContextxxxCTM calls (xxx is Rotate, Scale, or Translate) to see for yourself why transforms are not commutative. In general, you always want to Translate first, Scale second, and Rotate last.
I did the demo project in Objective-C because I am not quite up to speed on Swift 3 and it is not worthwhile doing anything new in pre-Swift 3. There are enough changes to Core Graphics calling conventions that Obj-C was just the fastest way to do it. For instance in Swift 2, you called all the Core Graphics APIs nearly identically to Objective-C... basically C function calls. In Swift 3, they made the API a part of the object (much nicer!).
If you'd like to see working CGPaths using Swift 3, see Mark Dalrymple's excellent article on Core Graphics Core Graphics, Part 3: Lines and his accompanying Swift 3 GrafDemo project. Hats off to Mark and Big Nerd Ranch for making this available to all.